
You can dig trench safely and efficiently with the right plan, tools, and technique, whether you’re installing drainage, running cable, or laying pipe. Know the purpose, mark utilities, choose the proper depth and slope, and pick the right tools—those steps will keep the job fast, accurate, and safe.
This guide dig trenches walks you through how to dig trenches by hand or with equipment, and it highlights best practices that prevent collapse, utility damage, and costly rework. Follow practical tips on planning, tool selection, and safety so your next trenching project goes smoothly and delivers the results you expect.
How to Dig Trenches
Plan the route, pick appropriate tools, and follow procedures that control slope, depth, and safety. Know utility locations, soil type, and whether you’ll use hand tools or machinery before you break ground.
Essential Tools and Equipment
Choose tools based on trench length, depth, and soil. For short, shallow trenches use a sharp trenching shovel, spade, pick mattock, and a hoe. Add a wheelbarrow and rakes for spoil handling.
For long or deep trenches use a walk-behind trencher or an excavator sized to the trench width and depth. Rent a plate compactor if you must backfill and compact in layers. Carry a tape measure, string line with stakes, and a level or laser for layout and grade control.
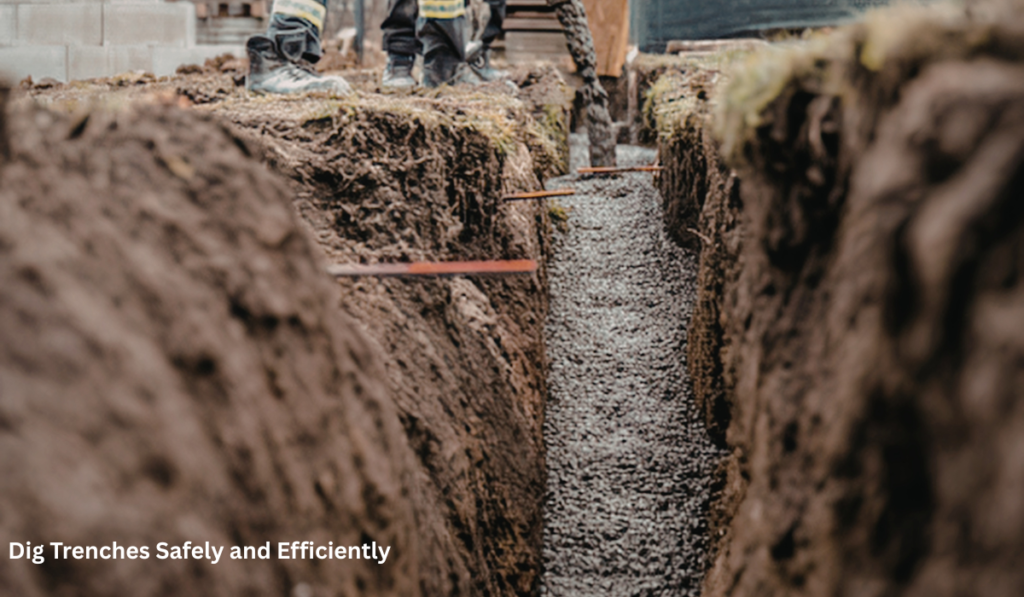
Always have PPE: hard hat, safety glasses, gloves, steel-toe boots, high-visibility vest, and a dust mask for dry soils. For trenches over about 1 m deep, include shoring panels, hydraulic shores, or a sloping/benching plan and a trench box sized to your excavation.
Step-by-Step Digging Process
Mark the trench path with stakes and a string line; measure depth and slope before digging. Call 811 (or your local utility location service) and wait for all underground utilities to be marked.
Remove topsoil first and set spoil at least 2 feet from the trench edge. Excavate in controlled passes: cut to final width, then dig to depth while checking grade with a level or laser. For hand digging, cut a clean edge with the spade, use the mattock for compacted layers, and remove loosened soil with a shovel.
If using a machine, work from stable ground and dig in increments to avoid undermining edges. Install pipe or conduit on a prepared bedding layer, then backfill in 6–8 inch lifts, compacting each layer. Keep final grade and surface restoration plans in mind as you close the trench.
Safety Precautions for Trenching
Identify soil type (Type A, B, or C) because it determines protection methods: sloping, benching, shoring, or trench boxes. Never enter a trench deeper than 1 meter (≈3.3 ft) without proper protective systems in place.
Maintain a safe spoil distance and keep heavy equipment at least 2 feet from the trench edge. Inspect the trench at the start of each shift and after rain, vibration, or any event that might change stability. Provide a safe means of egress—ladders or ramps—within 25 feet of workers.
Train everyone on recognition of hazards like hazardous atmospheres, water accumulation, and falling loads. If you detect a smell, fumes, or suspect a gas line, evacuate immediately and contact the utility company.
Best Practices for Trenching Projects
Focus on soil classification, protective measures to prevent collapse, and methods that balance speed with safety and accuracy. Apply site-specific controls, choose appropriate shoring or sloping, and match manual or mechanical techniques to task scale and risk.
Soil and Site Considerations
Identify soil type with a hands-on test (hand roll, thumb penetration) and, when in doubt, get a geotechnical report. Cohesive clays, granular sands, and mixed soils behave differently; classify them so you can pick correct slope angles, benching, or shoring.
Locate and mark underground utilities before digging. Call the local one-call service (e.g., 811) and verify depths with potholing or vacuum excavation where utility maps are uncertain. Keep spoil piles at least 2 feet back from trench edges to reduce pressure on walls.
Assess water and drainage: control surface runoff, dewater the trench as needed, and plan for groundwater inflow. Monitor weather forecasts and stop work if rainfall will significantly change soil stability.
Preventing Collapse and Erosion
Use protective systems based on trench depth and soil: benching or sloping for shallow, stable soils; trench boxes or shoring for deeper or unstable conditions. Follow regulatory slope tables or engineer specifications rather than estimates.
Inspect trenches daily and after events like rain or vehicle passes. Assign a competent person to check for signs of cracking, bulging, standing water, or vibration from nearby equipment or traffic. Evacuate the trench immediately when hazards appear.
Control erosion with temporary covers, sediment control barriers, and staged excavation that limits exposed length. Anchor shoring systems and secure crossing points so loads and vibrations don’t undermine trench walls.
Efficiency Tips for Manual and Mechanical Methods
Match tools to the task: use hand tools for precision around utilities and mechanical excavators for bulk removal. For small residential trenches, a mini-excavator plus handheld finishing tools often reduces time without sacrificing control.
Sequence work to minimize rework: locate utilities, set erosion controls, peel back topsoil separately, then dig to grade. Use tripods, winches, or small cranes for safe spoil handling and pipe placement in deeper trenches.
Maintain equipment and train operators on digging angles, bucket sizing, and proximity to edges. Use templates, grade boards, or laser levels to keep trench depth consistent and reduce time spent correcting misalignment.